## Product administration
The Product admin is for adding Product Generators.
> A Product Generator is the Script(s) container and surrounding meta data for a Product to be created.
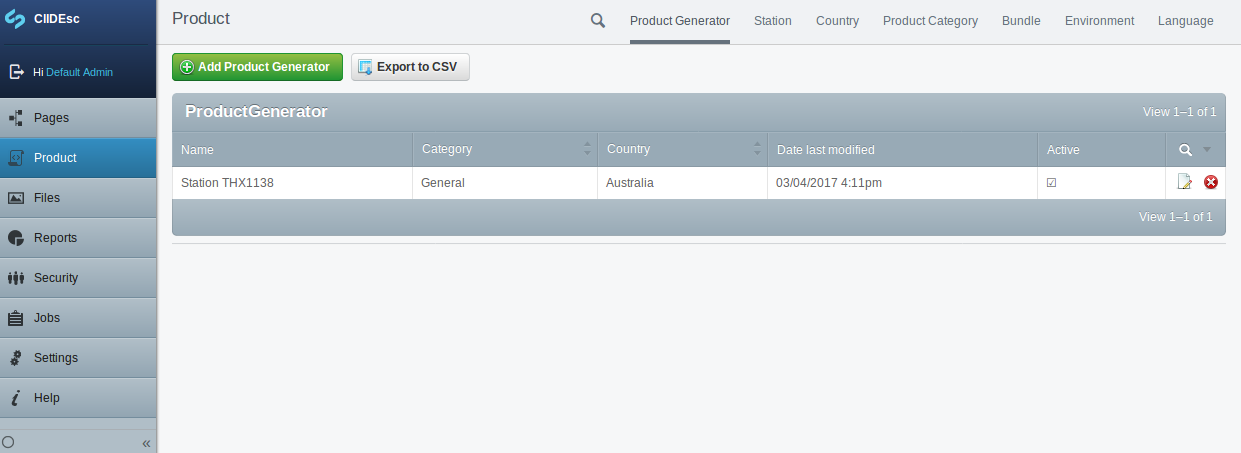
In the Product administration you can navigate several administration screens:
1. Product Generator
1. Use this screen to view the list of created Product Generators or create a new Product Generator
1. Stations
1. View the list of Stations or add a new Station manually
1. This list of stations determines which stations a product may query against
1. Country
1. View the list of Countries or add a new Country manually
1. The selected country can be used to define which users see which products by Country they are residing in
1. Product Category
1. View the list of Product Categories or add new Product Categories
1. Categories are used to group Products by Types configured by the administrator
1. Bundle
1. View the list of Product Bundles or add new Product Bundles
1. Bundles are used to group products to define which users see which products defined by the administrator. Some users may only see products in some bundles, and a Product Generator can be assigned to one or more Bundle. By default all Product Generators are placed in the Master Bundle.
1. Environment
1. Configure the Product Generator Script(s) executables and their local environment location
1. Language
1. Configure the Languages to be passed through the Product Generator script(s). If a Product supports translated outputs it will use the language selected byy the user configured in this admin, if the Product does not support the language selected then products will be provided in English by default.
### Create a Product Generator
To create a Product Generator click the 'Add Product Generator' button
You will be presented with the Product Generator form to complete the following fields:
#### Product Name
This will appear to the user as the title of the Product in the Classic View.
#### Description
The Description text should describe what the product is
#### Thumbnail
A small image to display with the product description
#### Country
Restricts this product to only to display to users assigned to the country selected. Countries are configured in the Product Country screen.
#### Category
Set the category for this product. Categories are administered in the Product Category admin screen
#### Primary Script
Upload the primary script to run to produce the product to this field.
#### Ancillary Scripts
Upload any additional scripts the primary script uses to produce a product.
#### Environment
Set both the executable environment and executable. These are configured in the Product Environment screen.
#### Inputs
Set the selections users are offered when they run a product. Select from those fields that apply, or enter your own as a space-separated list in the additional arguments field.
1. Start and End Date:
1. If "Start Date" is checked then "Start Date" is based on today date minus selected period.
1. If "Start Date" is not checked, then "Start Date" will not be passed to the script.
1. If "End Date" is checked then "End date" is today date.
1. If "End Date" is not checked, then "End Date" will not be passed to the script.
1. Languages
Check this checkbox to allow the user to select a language to pass through to the script; note that the Script must be able to support the languages selected. If the Script does not support the language selected, the outputs will be generated in English.
1. Stations
Use the radio buttons to select whether the user can select stations for your uploaded script.
* None; no station select appears to the user
* Single; allow the user to select from a list of stations your Script supports and imports
* Multiple; allow the user to select multiple stations your script supports and imports
1. Use Station Chain
Check this box to allow the user to select the use of Station Chains. Any station that is a primary station in a station chain will pass the chain to the Script.
1. Additional arguments
You can pass additional arguments to your script using this field, note that your Script must be written to support these arguments.
#### outputs
Here you can define the file names of your script outputs; note that the script must support the outputs you wish to generate. Set the desired script outputs such as: output.jpg, output.R, script.python, example.csv etc.
1. Make this product active i.e. so that it's available to be run
This checkbox makes the product "Active" and the product can be run from the administration or automated process
1. Show this product in menus
This checkbox alows users of CliDEsc application to see the product generator on Classic and Map Views to run.
> If the "Show this product in menus is checked but the product is not active, the product generator will not show in the CliDEsc Application"
> You can also use short code %s to dynamically use the station name for example %Sweather_report.jpg
#### Bundles
Bundles are used to restrict or group Product Generators for specific users allowed to see a Bundle.
### Stations
Here you can view Stations. Stations are pre populated by the initialisation of a Product Generator script, however you can add and remove stations using this administration area.
To create a Station click the "Add Station" button.
> Stations are intended to be pre populated on Product Generator initialisation. Adding or editing station information may result in unexpected behaviour if your Product scripts do not reference the station.
A station has 6 attributes:
1. Name - Name of the station
1. Identifier - The station ID
1. Type - The station type i.e. Rainfall, Acoustic etc.
1. Longitude and Latitude - these are used to display on the map screens
1. Country code
1. Click the "Save and Close" button to save your station
### Country
The CliDEsc comes with a number of Countries pre-generated for use. These are used to group products by country to display to users in that country. The administrator can modify or add new countries, however it is upto the uploaded script to support the countries added.
### Product Category
This screen allows administrators to configure custom categories to group Product Generators for users to filter against on the CliDEsc Application.
To create a Product Category
1. Click the "Add Product Category" button
1. Enter a Name in the Name field
1. Click the "Save and Close" button
### Bundle
Bundles group Product Generators to restrict which products are displayed to which users.
> The Master bundle is created by default and all users can view all products listed in the Master Bundle.
To create a Product Bundle
1. Click the "Add Bundle" button
1. Enter a Name in the Name field
1. Tick the 'Active' checkbox to make the bundle "Active"
1. Click the "Save and Close" button
> Checking the 'Active' checkbox makes the product available to be run, not checking this option keeps the product in the administration but not visible to CliDEsc users to r
### Environment
Here the administrator can configure which supported Executables are to be used for each Product Generator. An executable path must exist on the file server, if it doesn't exist then a validation error will occur until that executable exists on the file server.
### Language
Here the administrator configures supported Product languages. These language codes will be passed into a script if selected by the user. Note your scripts need to support the language configured.
### Station Chain
Here the administrator can configure one or many station chains. A station chain combines one station with another if data is to be queried over two stations. For instance if the primary station A contains data for January to February but Station B contains data from February to March then you would use the chain to completed the time line of data.
If a user selects a Station that has a related Station Chain and has checked the "Use Station Chains" option then the chain will be passed to the Product Script as A:B. If multiple chains exist i.e. if B is chained to C then this chain will also pass to the Script as A:B,B:C...and so on. But each pair will need to be configured in this screen
> You must have stations configured in the Stations screen before you can create a Station Chain
To create a Station Chain
1. Click the "Add Station Chain" button
1. Enter a Name in the Name field
1. Select a Primary Station
1. Select a Secondary Station
1. Click the "Save and Close" button